FONTS SETTINGS
Settings > Drawing > Fonts
Menu: Tools > Settings > Drawing > Fonts
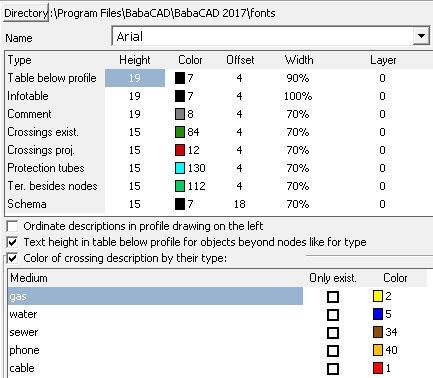 On the Fonts tab, you can specify the parameters of the fonts that are used in the generated drawing.
The requested typeface, choose from the dropdown list Name. It can be found on only those fonts installed on the system of which lend themselves to scaling. Moreover Drafter automatically added to the list of all files (not all fonts need to be) from the directory "Fonts" default CAD application. The names of these fonts are gray. If the font of this type are found, their use is stoned. If the program does not automatically find these fonts can be identified manually by pressing Directory button, the font directory application used to edit the generated profile.
Regardless for comments, the texts contained in the table below the profile and the imprint of the project can change the fonts, the following parameters:
- height
- color; Chosen from Colors window, opened by double clicking the left mouse button. There are 255 standard colors. Their subsequent numbers correspond to the numbers assigned to corresponding colors used in most CAD applications.
- distance from vertical line (Space column).
- width percentage (Width column). Described as a percentage (100% means that the width is not modified by changing the value - is changed character width).
- layer, to which the text will be assigned on the drawing (Layer column).
By default, in the table under the profile descriptions are placed on the right of vertical line (passing through the node). Option Ordinate descriptions in profile drawing on the left allows you to put names to the left of the vertical line.
If Text height in table below [...] checkbox is checked then for descriptions of elements eg. collision, protecting tubes etc. placed in the table below longitudinal cross-section will be used text height assigned to them instead of assigned to row titled Table below profile.
By checking the Color of crossing description by their type option, you can use the collision description color defined independently for different crossing types. To add a new crossing type to the table, press the Insert button on the keyboard. Each type of crossing type must be in a separate row of the table.