DATA TABLE AND PANEL
The "Data" tab
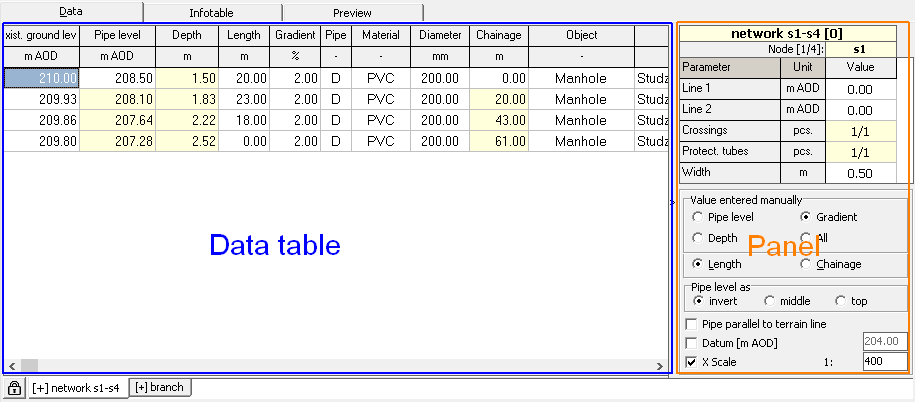
The Data tab is the most important part of the Drafter. It is where most of the data describing the individual nodes of the profile are entered. The tab is divided into three parts:
- The largest one, the Data table with most frequently used parameters that characterize the pipeline.
- Panel ? flyout in the right part of the tab, with less frequently used columns of the Data table and parameters of the created profile.
- Tabs bar ? in the lower part, with names of profiles included in the project
The Panel can be extended/retracted in several ways:
- Clicking the
 button on the toolbar
 - Pressing F4 button on the keyboard
- Choosing in menu: Tools> Panel
- Clicking on the right edge of the screen (while using program in full screen mode)
In addition, you can make another settings in the Panel and they are described in Profile parameters section.
To change the order of columns in the Data table or rows in the Panel , left-click on the column/row and hold down the button to move and drop it to another location.
You can move individual parameters between the Data table and the Panel. To move a column from the Data table to the Panel, right-click on any value in the table and select Move column ? to Panel. Similarly, you can move a parameter from the Panel to the Data table.
For most columns in the Data table it is possible to bulk change the values for selected nodes (ways of selecting multiple nodes are described in the chapter Data entry rules). To do this select the nodes for which you want to assign a new value. Then right-click on the selected area and select Change value? option. In the Change value window you can enter a new value and choose the way of using it:
- As below - the existing values in the selected cells in the Data table will be replaced by the new value
- Multiply by - the existing values in the selected cells in the Data table will be multiplied by the defined value (e.g. change the sign to the opposite when entering the value -1)
- Change by - the existing values in selected cells in the Data table will be incremented/decremented by the specified value (e.g. raise the ordinate of a pipe bottom by the specified value)
Confirm the data you have entered with the OK button or the Enter key.
In the tabs bar below the Data table the individual tabs correspond to the successive profiles included in the project. The tabs contain the names of the profiles. When you right-click on a profile name, a menu unfolds:
- Include > Current profile (on/off) - enables/disables the current profile
- Include > Only current profile - disables all profiles, leaving only the current profile enabled
- Include > Only profiles of Type? - leaves only profiles of the type of the current profile enabled
- Include > All profiles except the current one - enables all profiles except the current one
- Include > All profiles - enables all profiles
- Insert - inserts a clean profile into a profile
- Duplicate - adds a new profile based on the current one
- Delete - removes selected profile (project must contain at least 1 profile)
- Mark as main - option useful when automatically created scheme drawing does not meet expectations
- Rename - invokes the window allowing you to give a new name to the profile
- Attach to the profile - invokes the window allowing to select the profile to which the current profile will be attached.
A disabled profile, among other things, is not included in generated drawings and lists of materials. The names of enabled profiles are preceded by [+] and disabled by [-]. The tab order can be changed by ?grabbing? it with the mouse and dragging it to a new place. Change of tab order is not possible when padlock icon on the left side of the bar is activated.
 A new profile can be inserted into a project in several ways:
- By selecting the Insert or Duplicate option in the aforementioned menu,
- By selecting menu: Profile> Insert or Profile> Duplicate,
- By clicking a
 icon on the toolbar
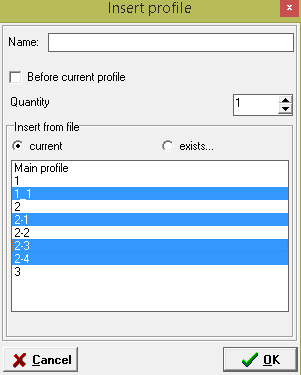
Performing any of the above actions will cause the Insert Profile window to appear. In the Name textbox you can enter the name for the created profile. Leaving the field empty will cause the program to assign the name automatically. When inserting a profile that already exists in the current file or another file it is recommended to leave the Name field empty. Then the name of the imported profile will be assigned to the inserted profile (or multiple profiles).
By default the new profile is inserted after the currently selected profile in the list of tabs under the Data table. If the option Before current profile is checked then the new profile will be inserted before the current tab.
When inserting a profile from a file, after selecting the file, a list with the names of profiles existing in it becomes active. In the list you can select one or several (e.g. by holding down the Ctrl key) profiles.
By means of number specified as Quantity you can impose number of inserted profiles. Default value is 1. Eg. if you have defined connection/branch template in some file, you can immediately insert required number of connections into new project, by changing Quantity parameter.
Current version:4.20
- Data table
- Data table - shortcuts
- Entering data
- Data exchange
- Network creating rules
- Searching data
- Profile parameters
- Crossings editor
- Protecting tubes editor
- Cross section editor
- Geological cross section
- Terrain description
- Boundaries description
- Additional ordinates
- Sewage treament plant
- Manholes
- Statistic
- Statistic - algorithms
- Materials' list